Cross-Chain Token Standard - Registration & Administration (SVM)
When token administrators want to register their SPL token for Cross‐Chain Token (CCT) operations, they interact with the Router program.
Two key steps ensure a secure assignment of the administrator role:
- The intended administrator is proposed (i.e., placed in a pending state).
- That pending administrator must explicitly accept the role.
Self-Service Registration Flow
If your SPL token supports an automatic way to determine an admin using onchain verifiable data (e.g., you hold the mint authority), you can complete self-registration in a permissionless manner by calling the Router's owner_propose_administrator instruction:
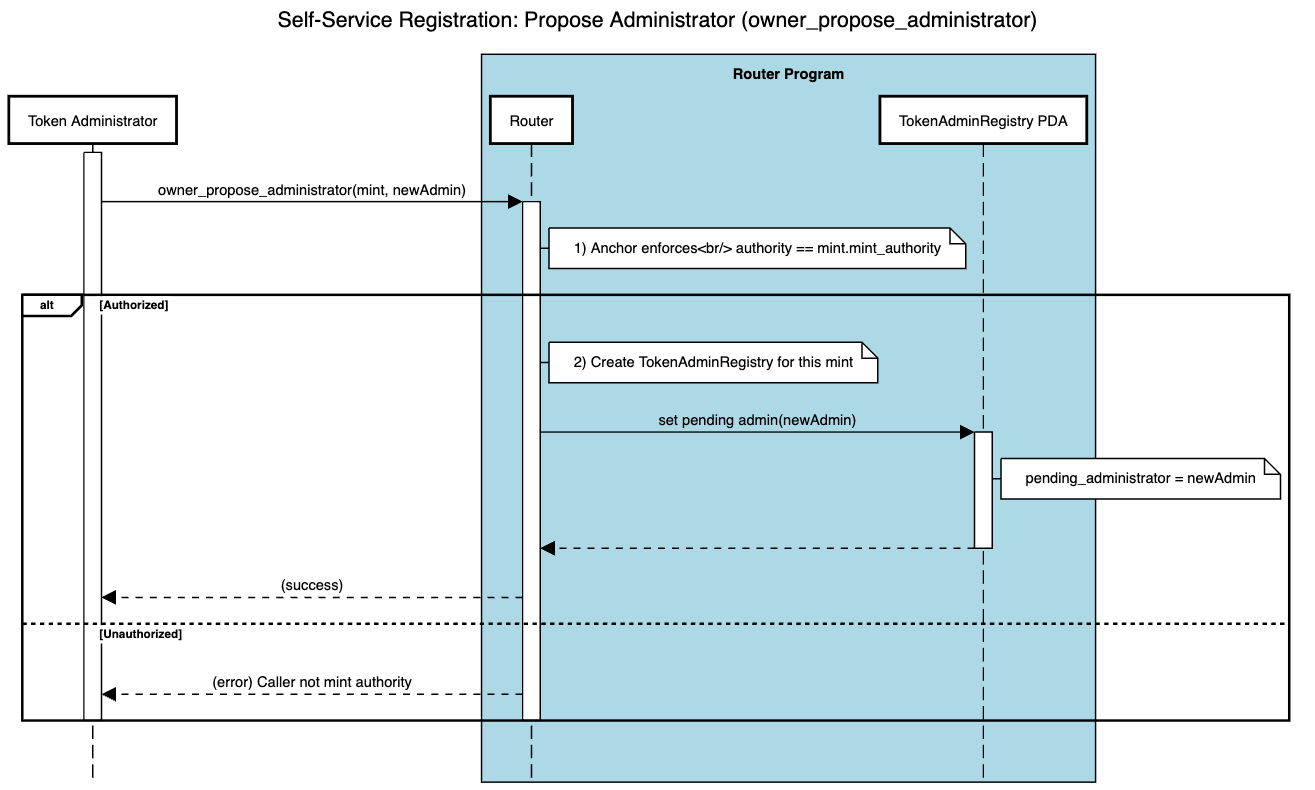
- Admin Initiates Registration: The token admin calls the Router's
owner_propose_administratorinstruction, passing in the mint and the proposed administrator's public key. This instruction initializes aTokenAdminRegistryPDA for this mint. - Determine Administrator: The Router ensures that the caller is the SPL token's mint authority, confirming they have the right to set a CCIP admin.
- Propose Administrator: The Router sets the proposed administrator as the pending administrator. The token admin is not fully recognized yet; they remain
pending. TheTokenAdminRegistrynow stores this user aspendingAdmin. The next step is to accept the role.
Non-Self-Service Registration Flow
For token programs that do not have a standard way to identify an administrator using onchain verifiable data (e.g., no direct mint authority check), the token developer can manually initiate the registration by submitting a request here.
Interacting with the Registry
Proposing the Administrator
The following sequence diagram illustrates the process of proposing the administrator.
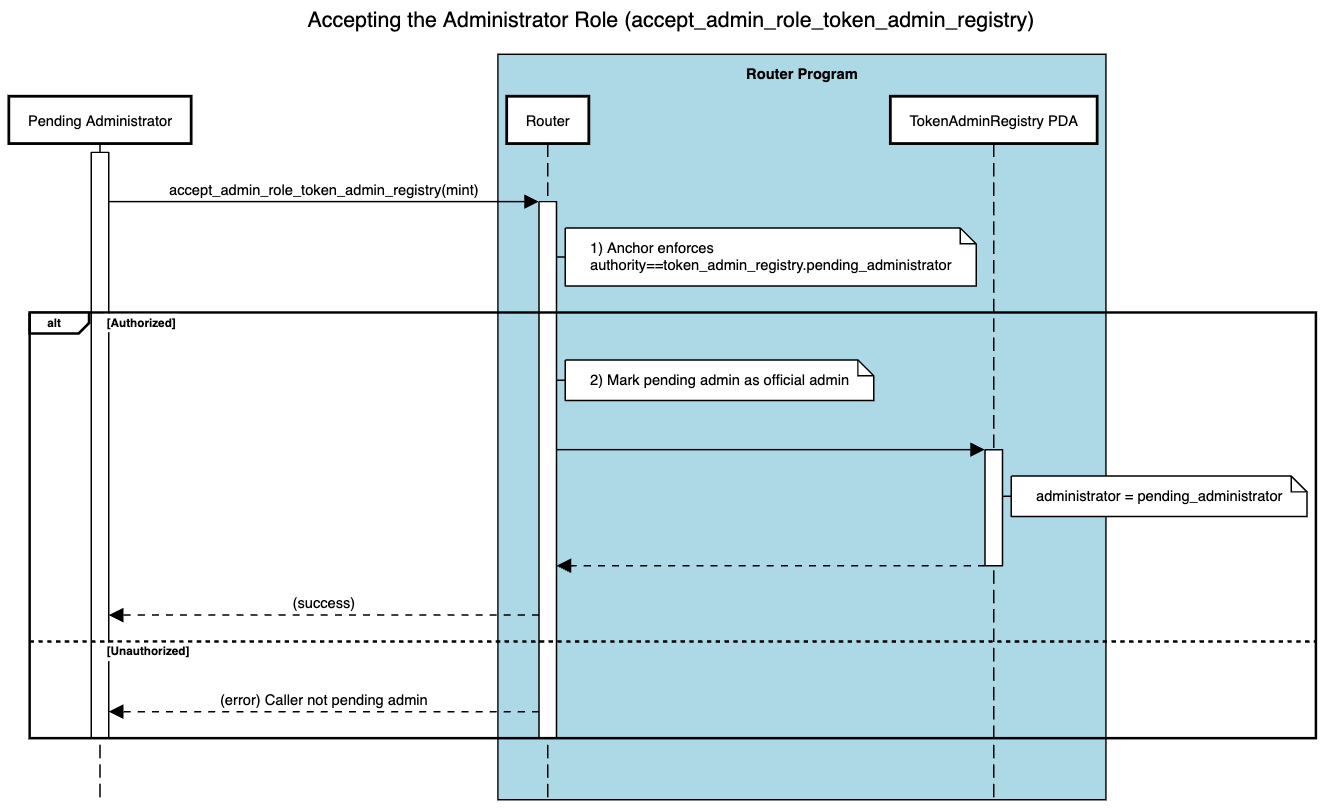
Accepting the Administrator Role
Once the administrator has been proposed and is pending, they must accept the role to complete the registration process. This step finalizes the administrator's assignment.
-
Pending Administrator Calls
accept_admin_role_token_admin_registryThe pending admin invokes
accept_admin_role_token_admin_registry(mint)on the Router program, specifying the mint for which they were proposed. -
Finalize Registration
- The Router checks that the caller's public key matches the
pending_administratorfield in theTokenAdminRegistryPDA. - If authorized, the Router sets
administrator = pending_administratorand clearspending_administrator. At this point, the role is fully active.
- The Router checks that the caller's public key matches the
Below is the sequence diagram illustrating how the pending administrator interacts with the Router program to complete registration.
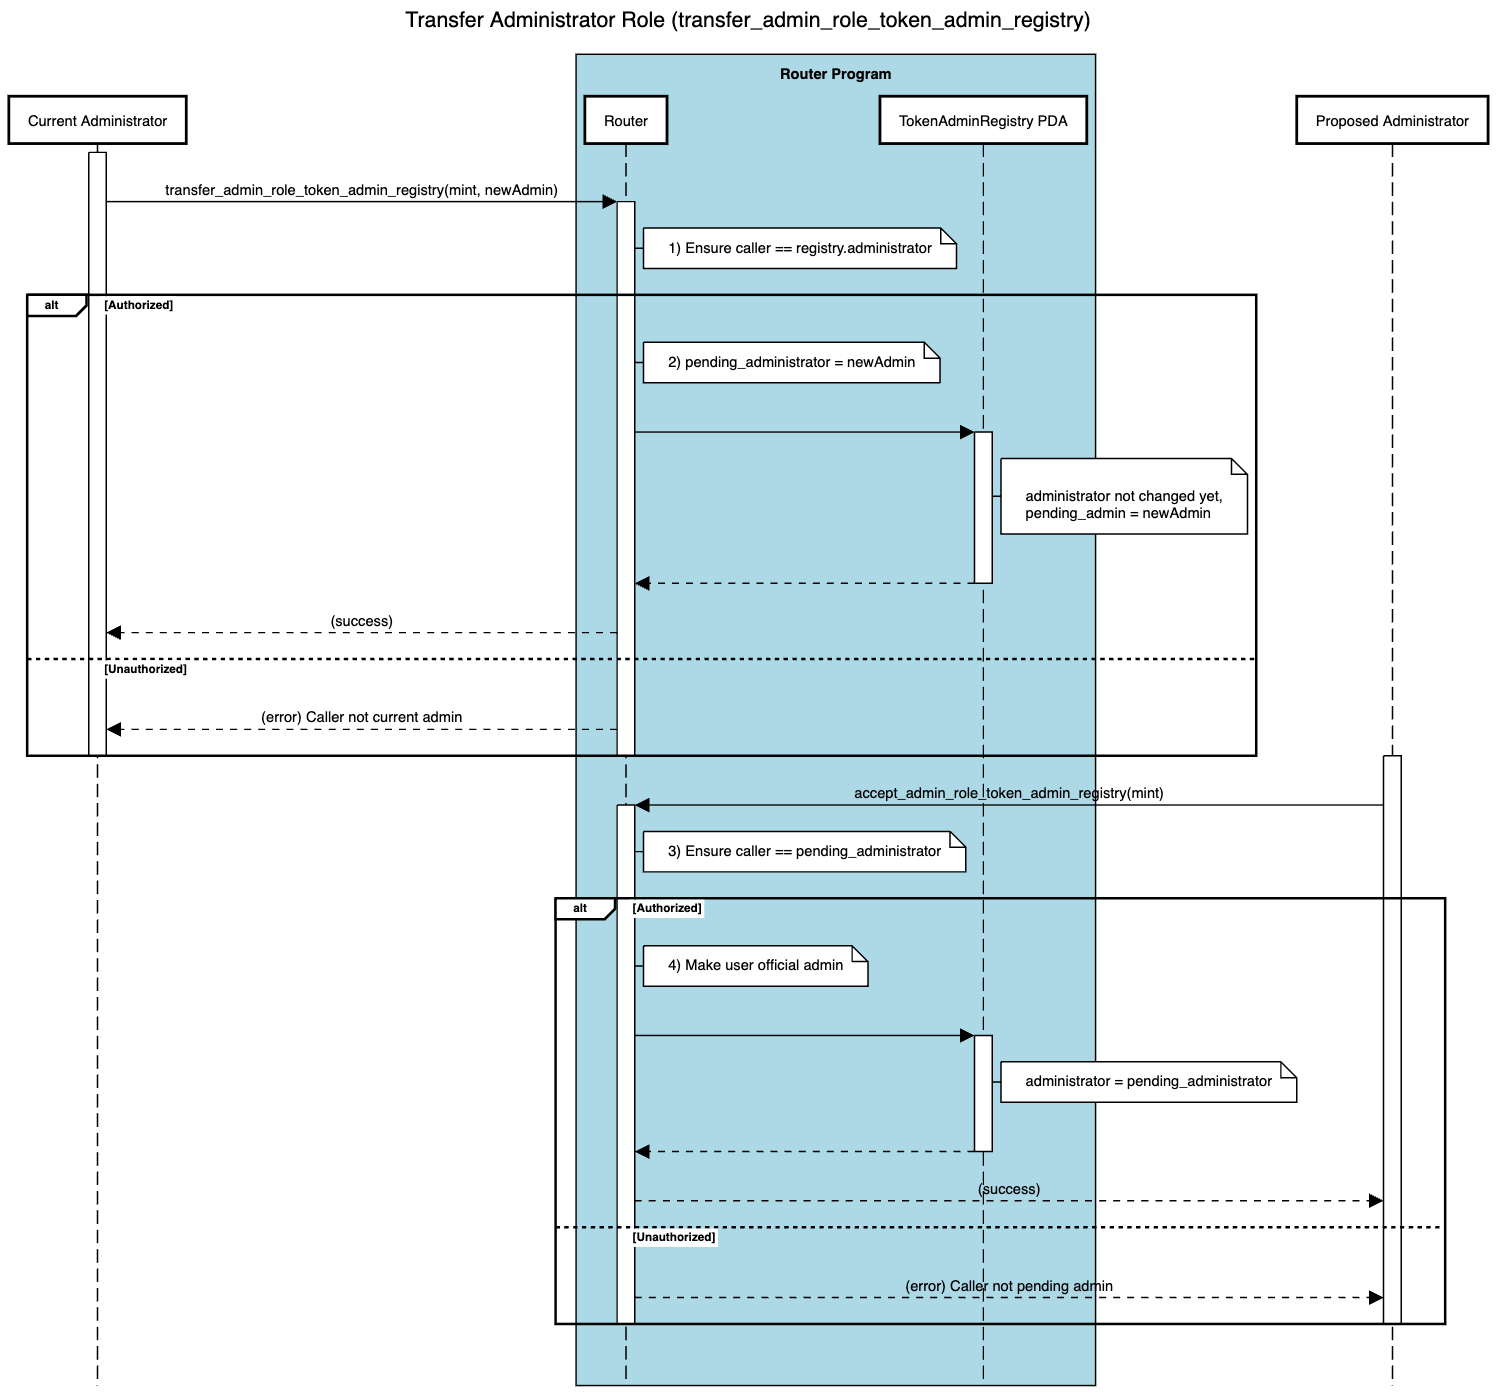
Transfer Administrator Role
The transfer_admin_role_token_admin_registry instruction allows the current token administrator to transfer their role to a new administrator. This transfer process is secure and involves two steps, requiring the new admin to accept it explicitly before finalization.
- Initiate Role Transfer
- The current admin calls
transfer_admin_role_token_admin_registry(mint, newAdmin)on the Router, passing the SPL token mint and the new administrator's public key. - The Router checks that the caller is the token's existing administrator. If so, it sets
pending_administrator = newAdminin theTokenAdminRegistry(PDA).
- The current admin calls
- Pending Administrator
- The registry is now pending. The existing admin will still be active until the new admin accepts.
- Accept the Role
- The new administrator must call
accept_admin_role_token_admin_registry(mint)to finalize the transfer. - If
authority.key()matchespending_administrator, the Router updatesadministrator = pending_administrator. Otherwise, it will fail. - Once accepted, the new administrator can set or modify the token pool.
- The new administrator must call
Below is a sequence diagram showing how the transfer is requested, followed by how the new admin must accept to complete the handover.
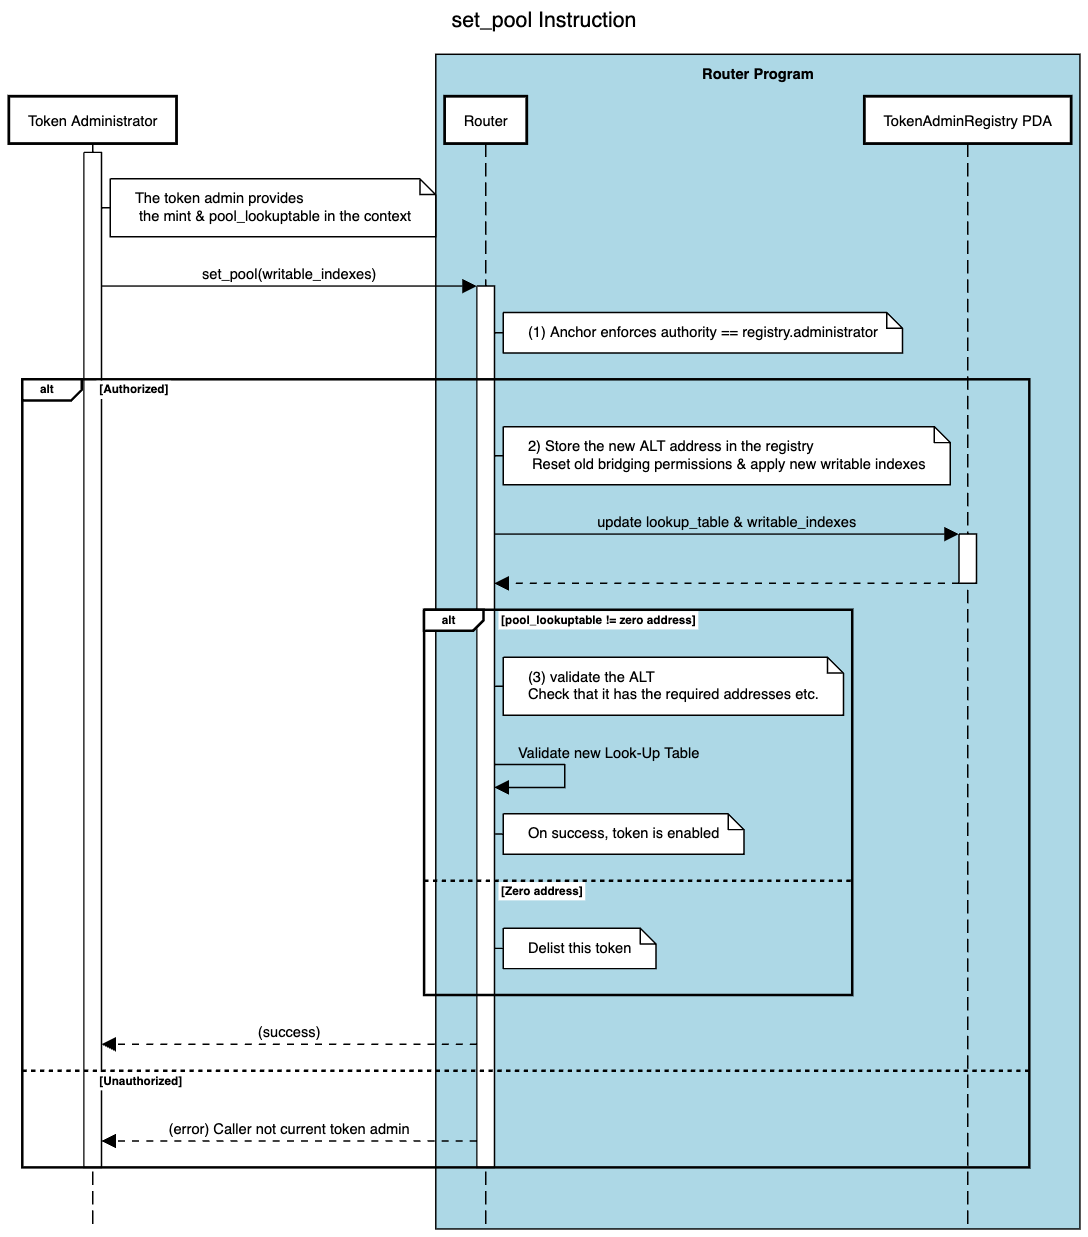
Setting the Token Pool
On SVM-based blockchains (e.g., Solana), the set_pool instruction enables a token administrator to map a given mint to the pool lookup table that defines how that token is handled in cross-chain transfers. This instruction modifies the TokenAdminRegistry PDA so the Route program knows which token pool accounts can lock or burn tokens on the source chain (and release or mint them on the destination).
- Set Token Pool: The current administrator calls the
set_poolinstruction on the Router program, passing in:- The token mint (for which we are configuring cross-chain transfers).
- The
pool_lookuptableaccount (the Address Lookup Table containing the mandatory PDAs and program addresses for that token pool). - A list of "writable indexes" indicating which lookup table entries should be marked as writable during cross-chain transfers. These indexes specify positions in the ALT that require write permission for successful transaction execution.
- Reset Old Pool, Apply New Settings: Under the hood, the Router updates the
TokenAdminRegistryPDA:- Overwrites any previously stored Address Lookup Table reference.
- Resets the old permission bits, then enables the specified "writable indexes."
- This ensures the new token pool has the correct set of PDAs with the correct writable permissions.
- Validate or Delist:
- If the new
pool_lookuptableis not the zero address, the Router checks that this lookup table has at least the minimal set of addresses required for cross-chain transfers. This includes the token mint, pool program, token program, pool configuration PDA, and any other mandatory accounts specified by the pool implementation. If valid, the token becomes enabled for cross-chain transfers. - If the
pool_lookuptableis the zero address, the token is effectively delisted from CCIP, meaning no new cross-chain transfers can occur.
- If the new
The sequence diagram below explains how the set_pool instruction updates the TokenAdminRegistry PDA and either enables or delists the token for cross-chain transfers.
Configuring the Token Pool
The configuration of token pools includes adding new blockchains, setting remote pool addresses, and applying rate limits for cross-chain transfers. The following instructions are used for configuring token pools:
-
Initialize a Remote Configuration
- Instruction:
init_chain_remote_config - Use Case: Create a new onchain account (PDA derived from the chain selector and token pool program ID) holding configuration details for a specific remote blockchain (e.g., remote token address).
- Read the API reference to learn more.
- Instruction:
-
Edit an Existing Remote Configuration
- Instruction:
edit_chain_remote_config - Use Case: Update the entire stored configuration for a remote chain (
RemoteConfig), including the remote token address and decimals. - Read the API reference to learn more.
- Instruction:
-
Add Remote Pool Address
- Instruction:
append_remote_pool_addresses - Use Case: Register one or more remote pool addresses for the same remote chain. This can happen when you deploy a new pool version on that blockchain but keep the old address functional until all in-flight messages are processed. Note: To remove a remote pool address, call
edit_chain_remote_configwith a new configuration without that address. - Read the API reference to learn more.
- Instruction:
-
Configure Rate Limits
- Instruction:
set_chain_rate_limit - Use Case: Apply or modify the remote blockchain's inbound/outbound rate-limit configuration. This uses a token bucket algorithm in which you can configure the capacity (maximum tokens) and rate (tokens per second refill rate) for both inbound and outbound transfers.
- Read the API reference to learn more.
- Instruction:
-
Remove Chain Config
- Instruction:
delete_chain_config - Use Case: Remove the remote blockchain configuration PDA to stop supporting it permanently.
- Read the API reference to learn more.
- Instruction:
-
Liquidity Management (Lock/Release only)
- Instruction
set_rebalancer: Configure which public key is authorized to add (viaprovide_liquidity) or withdraw liquidity (viawithdraw_liquidity) from the pool.set_can_accept_liquidity: Enable or disable whether the pool can accept incoming liquidity via theprovide_liquidityinstruction.- Use Case: Lock/Release token pools require liquidity management to ensure sufficient tokens are available for releases. These settings control which wallet or multisig is authorized to withdraw or add liquidity to the pool.
- Read the API reference to learn more.
-
Optional Allowlist
- Instruction
configure_allow_list: Setenabled = trueorfalseand optionally add new addresses. When the allowlist is enabled, only addresses that appear on it can initiate cross‐chain transfers.remove_from_allow_list: Remove specific addresses from the existing list.- Use case: You can add or remove addresses if the pool has an allowlist. This provides an additional layer of access control for who can initiate cross-chain token transfers.
- Read the API reference to learn more.